Gear List: Twin Sisters Alpine
All my trips start with a handshake/hug/high-five, and a gear check. We’ll talk about the route, the weather forecast, and then make sure our gear matches the conditions. This can be a verbal gear check for old hands, or a complete yard sale for the new folk.
Here is a comprehensive gar list that includes pieces needed for these specific routes from June to September, in all possible weather. Some things need to come no matter what the conditions - other pieces of kit may end up being left behind. If you have things you’re unsure about, bring them and let’s consider their usefulness versus their space and weight. My goal is to refine your kit and find that balance between being prepared and keeping your pack as light as possible.
While I do have a few extra ice axes, crampons, harnesses and helmets, I’m an operation of one and not prepared to rent equipment. I do know every climbing shop between Seattle and Bellingham that does. Please let me know what gear you’re missing as soon as possible so we can be sure to get you the gear you need.
I do provide tents, ropes, stoves, fuel, breakfast and dinner. Please bring your own lunch and snack food, and if you have any dietary preferences or restrictions please let me know as soon as possible.
The Routes
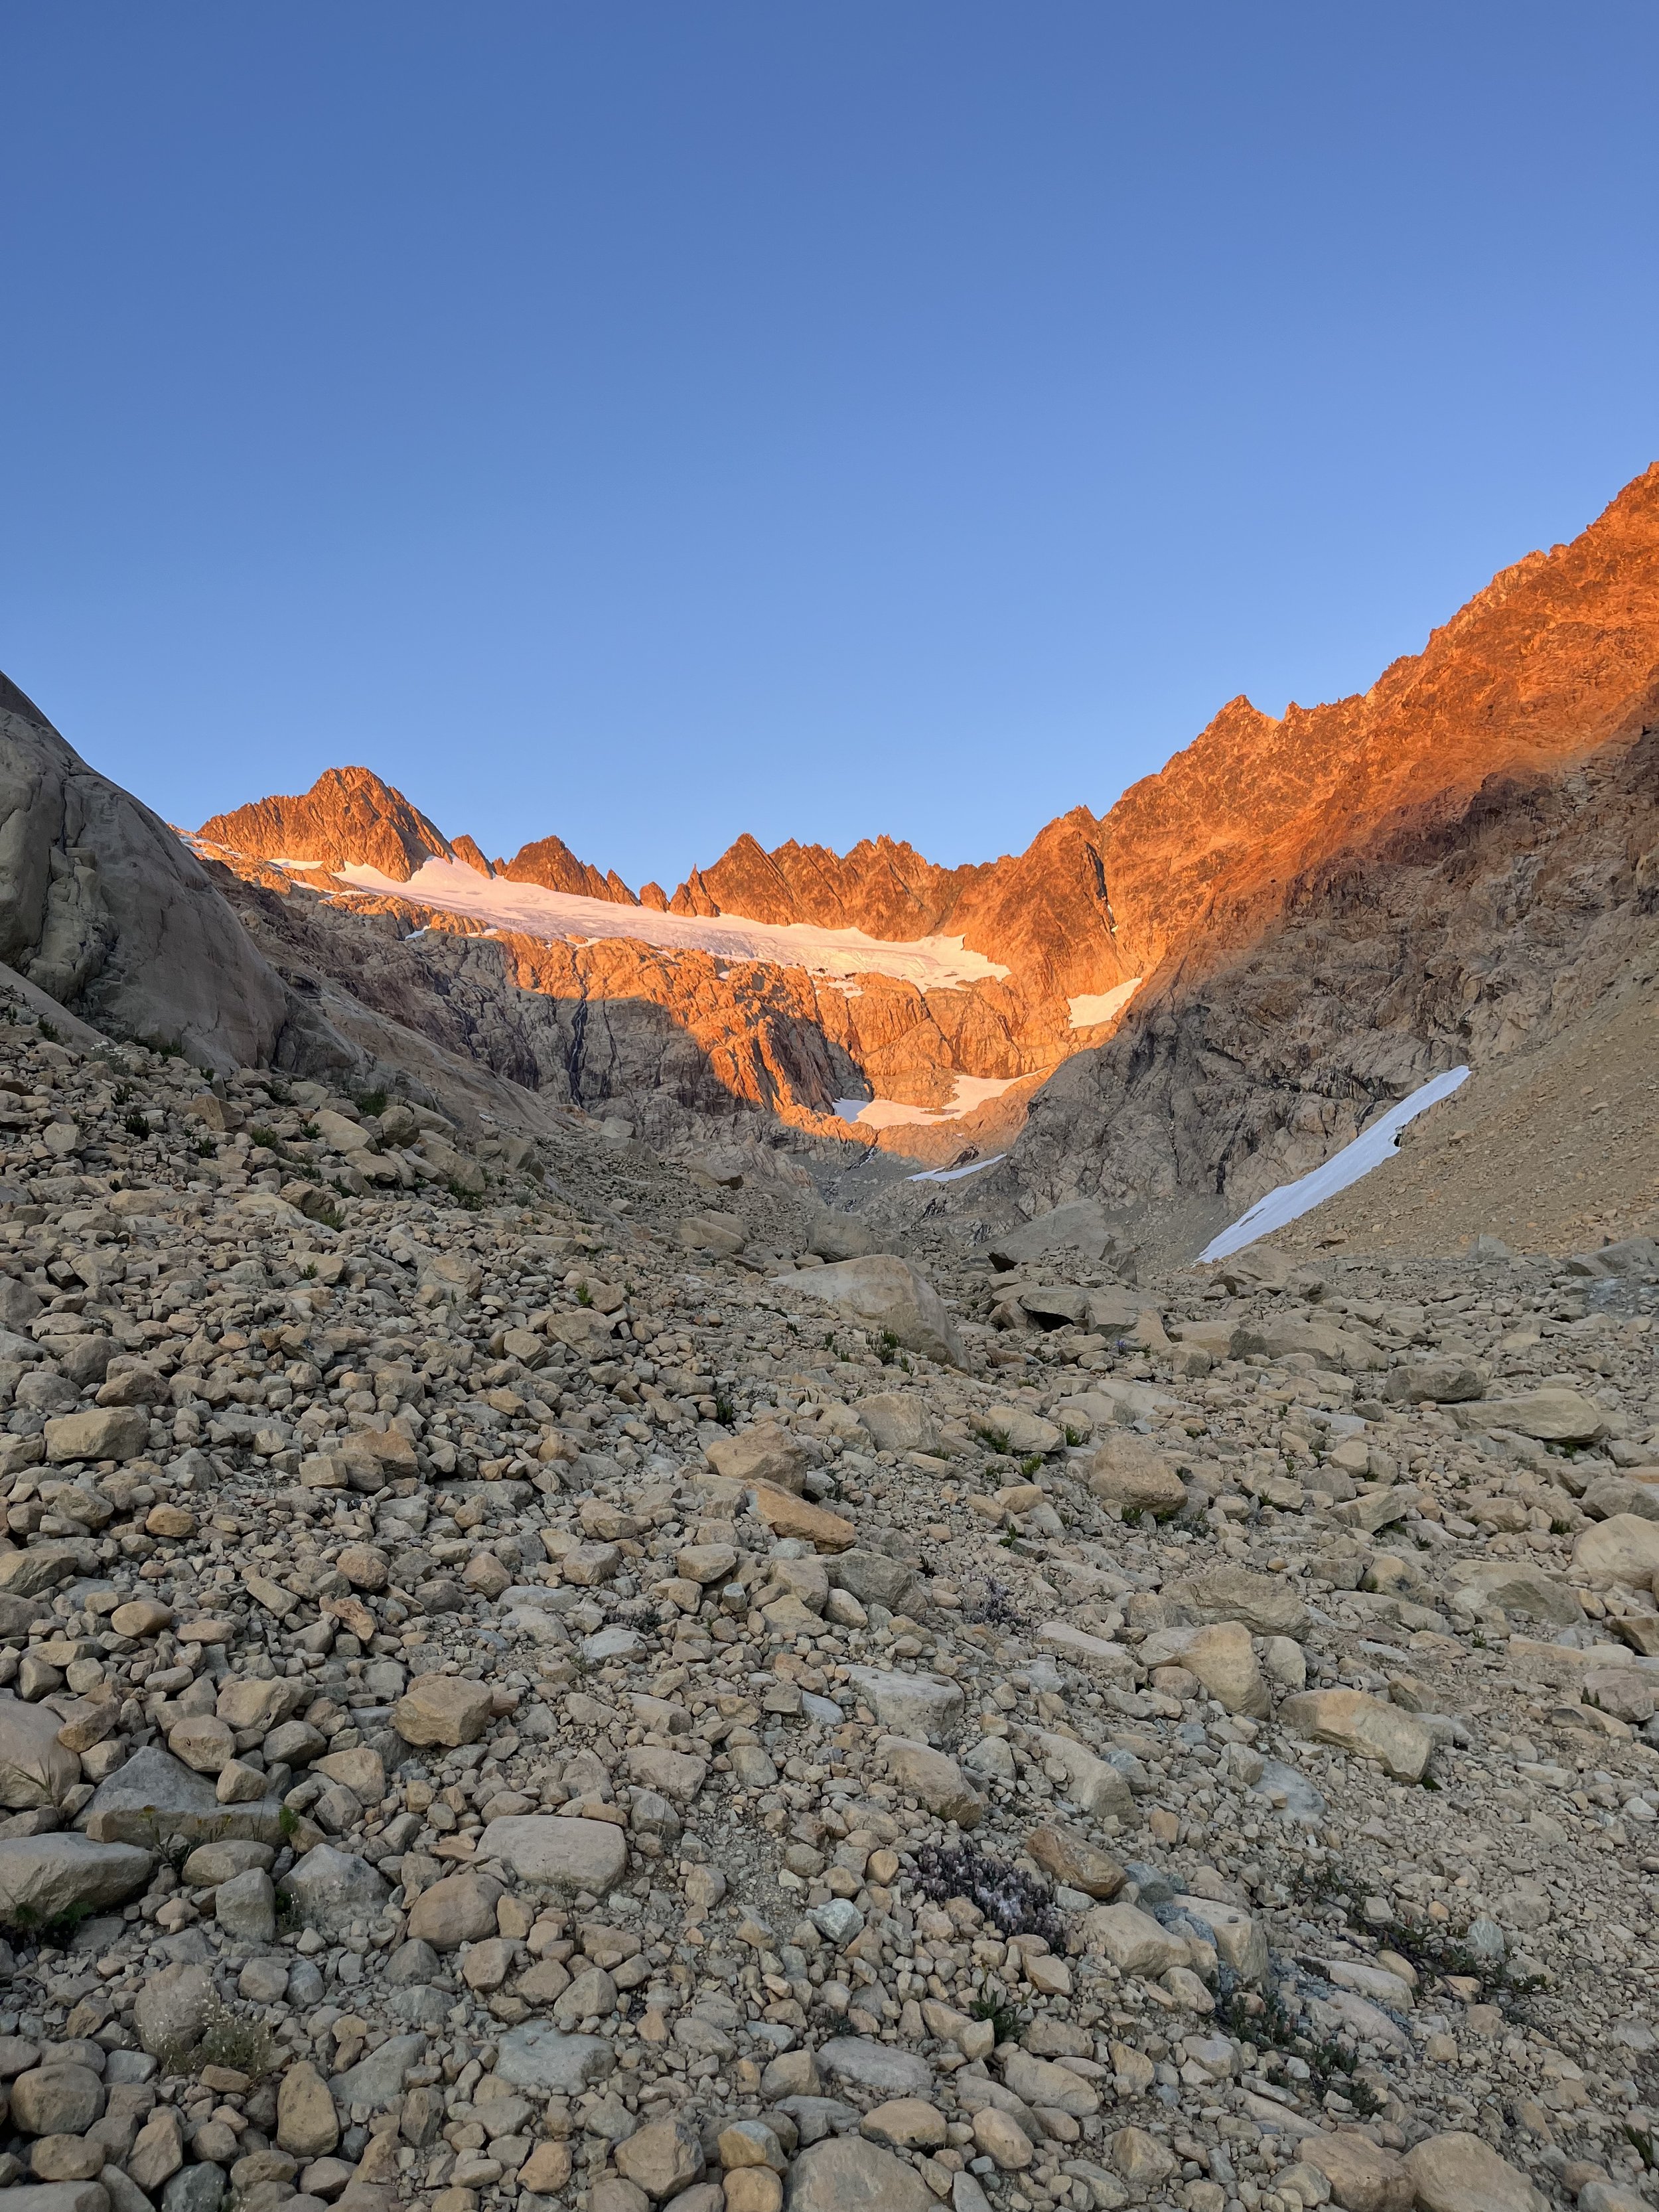
The Twin Sister Range seem to be one of those mountain ranges that everyone notices, but no one remembers. It’s plainly visible from multiple places in western Whatcom and Skagit Counties, and even more so when I’m watching the sunset behind them from a bivouac on Kulshan. The range is made of dunite - this golden orange and red rock laced with green olivine, some of the most concentrated and pure olivine in the world. This gives it a friction like 40 grit sandpaper. The glaciers are some of the lowest west of the Cascade divide, so they’re also in retreat and melting fast. The range is also relatively low elevation compared to the North Cascades: summits are 6400 feet to 7000 feet, and campsites are 3400 feet to 4000 feet. So clothing needs to be durable, ice axes and crampons can be lightweight, and insulation can be minimal.
Climbing
Helmet. Needs to be UIAA rated for climbing. My personal favorite is the Black Diamond Vapor, but the BD Half Dome is a long-time crowd pleaser - reliable and long lasting. There are several models in between that are great compromises. An awesome budget option I recently learned about is the Metolius Hardtop - about 33% heavier than the Vapor but only 40% the cost. Rumor has it that Blue Ice is going to be producing a helmet next year, so I’m holding out a little bit longer to see what they’ve got coming.
Mountaineering ice axe with adze. No longer primarily a walking stick, I prefer and recommend shorter sizes. Check out the Blue Ice Akila, Bluebird, or the ultra lite Hummingbird. Talk to me about your future ambitions if you’re having a hard time deciding which.
Alpine Climbing Harness. These typically have no padding to save weight and space in your pack. I wear the Blue Ice Choucas Pro, but I think most would be happy with the standard Choucas.
Triple Action Capturing Locking Carabiner. That’s a lot of words to make sure the gate stays locked when you want it and features a second smaller gate inside the carabiner’s geometry to capture your belay loop and keep the carabiner ideally oriented. My personal favorite is the Grivel Clypsydra L, but most folks would find the Edelrid HMS Bulletproof Triple FG more familiar.
Belay Device - tube-style, double rope. Climbing the summit pyramid on Shuksan requires one. My current favorite is the Mammut Nordwand Alpine Belay - same mechanics as the BD ATC Guide or the Petzl Reverso, but uses steel at the wear points and still doesn’t add weight.
A second Triple Action Capturing Locking Carabiner. That first one was for your belay device. But you may need a second one to securely attach yourself to the middle of a rope. Luckily Grivel offers the Clypsydra S - everything I like about the Clypsydra but in a smaller size. Alternatively, Edelrid offers the HMS Strike Triple FG - similar to the Bulletproof, without the steel to save weight. Alternative: Purchase a locking carabiner and second non-locking carabiner of the same size. This is a little more versatile for other applications. An example of this is the Black Diamond Liteforge Screwgate Carabiner paired with a Hotwire Carabiner. If you already own a variety of carabiners, or if this is getting confusing, feel free to contact me to discuss.
Non-Locking Carabiner. Any will do, but the two I use are the Black Diamond Hotwire and the Edelrid Pure Wire.
Nut tool (optional). These routes do involve some gear placements, and I find it easier if everyone has their own nut tool to remove nuts, aka stoppers. It typically requires another non-locking carabiner to rack it.
“Double-length” or “Double-Shoulder” Sling, cord or webbing. This is (as the name implies) twice as long as a “Shoulder” Sling, or 120cm/48” long. The Blue Ice Mission Light (red) is great, but anything that is 10 mm wide or even less works, like the Black Diamond Dynex Runner (blue).
Mountaineering Boots or high-top approach shoes. I’m currently using the Scarpa Ribelle HD, but I’m a big proponent of high-topped approach shoes. Salewa is my current favorite, they offer a number of good options. I think I’m using an older pair of the Salewa Pedroc Pro Powertex Mid Boots for the third and likely last season (they’re pretty chewed up). There are heavier and more durable options too.
Boot Crampons. The best “quiver of one” crampons have a steel front toe paired with an aluminum heal to reduce weight. This steel/aluminum combo makes them a great generalist tool too, and should last you a good long time. I really like how the Petzl Irvis Hybrid packs so small, and are easy to adjust. They come with both kinds of toe bails, but you need to order the “Back Flex” heel bails if you want to use them with shoes or boots that don’t have that heal welt. I also recommend adding a replacement pair of Cord-Tec: it’s the one part that is expected to wear out, and usually when one fails the other is close behind. It’s an easy repair to do in the field, so I just keep a spare pair of cords in my repair kit. Aluminum crampons are also approriate here - if you’re interested in expanding your gear selection, consider purchasing an all-aluminum crampon (not trail cleats/spikes). I’m happy to make recommendations.
Trekking Poles. They make a difference - they help with your balance (and therefore energy) and reduce impacts on ankles, knees, hips and back. My favorite are the Black Diamond Distance Z Trekking/Running Poles, and I like to get them shorter than my ski poles (usually one size down).
45L-55L Backpack. I use a 45L liter pack for up to 10 days! To be fair I also use a lot of lightweight, compact kit and minimal food, but I believe a 55L pack is plenty big enough for any four-day trip into the mountains. There are a ton of options out there! I keep experimenting with brands, and keep coming back to Blue Ice Warthog 40 and Stache 60; and Black Diamond Speed 40 and Mission 55. These brands seem to be the best compromise between comfort, weight, function and value.
Camp
Sleeping Pad, foam or air. Foam is more durable but less packable. Air packs smaller but you need to take more care of it. The Thermarest Z Lite Sol would be my foam choice, and the Thermarest NeoAir XLite is the air mattress I use most.
Sleeping Bag. For the summer, I recommend a 25°F / -4°C sleeping bag. A tent adds 5°-10°F of insulation too. If you sleep warm, you can even go with a 35°F/2°C bag. I typically use a 25° bag for May into June and cold September forecasts, and a 35° bag for warm June forecasts, July, August and most September conditions. I like how sleeping bags prevent drafts versus sleeping quilts. I really like the Feathered Friends Vireo and Tanager bags. I have one of each (when the Tanager was rated for 25°), but if I only had one, I’d probably get the Tanager 30°. These bags last - I still have my original Vireo from 2004!
Compression Stuff Sack (optional). This is an awesome piece of kit for your sleeping bag, compacting it down to a nice tight small ball between a grapefruit to a pineapple in size. Use the dimensions of the original stuff sack to pick the compression size you need. Pro Tip - if you don’t know the stuff sack volume (usually measured in Liters), ask ChatGPT to figure it out by giving it the the stuff sack length and width dimensions. Yes, they taught that calculation in high school geometry class. No I don’t remember it. Then compare that to the available Ultra-Sil Compression Sack sizes from Sea To Summit and pick the closest match.
Bowl. The Fozzils Snapfold Bowl is a great piece of kit. Unfolded it cleans and packs easily. Sold in pairs.
Spoon. I have a half-dozen random lexan spoons picked up from various gear shops in my silverware drawer.
Hot Drink Bottle. My favorite cup is a 500mL/16oz Nalgene. The screw-on lid keeps me from spilling it while my coffee, hot chocolate or tea cools. It lets me enjoy my meal and my drink at the same time. And it doubles as a water bottle if I only need to carry a little bit - not uncommon in the Pacific Northwest.
Water Purification. I do make sure that everyone on my trips can drink filtered or treated water, and I carry iodine tablets and/or an MSR TrailShot. If you have an alternative water treatment you prefer, then please don’t hesitate to bring it. We typically only need 1-2 filters per team, but we don’t need to filter water that is going to be brought up to a boil for dinner, or melted from clean snow.
Water Storage. I carry water during a climb and want to have a convenient water bag for camp, so I bring an MSR Dromlite Bag. The 4L bag (medium) is the perfect size - I can carry it half-full while climbing and fill it up to the max line for camp. Alternatively, you can bring two 1L Nalgene bottles.
Food Storage Bag. Everywhere except Olympic National Park allows for soft-sided bear-proof food storage. Coincidentally, bear-proof sacks are also mice, wood rat, and raven proof. The Ursack Major is the GOAT, available in black or white. I don’t recommend the XL or 2XL - the easier they get to fill, the more difficult they fit in your pack. If you need more storage, consider investing in a second Major sack instead.
Clothing Storage Bag. Having a stuff sack for clothes - especially clean clothes, especially when I’m base camping - is a real convenience. It can even double as a pillow. I just recycle one of the stuff sacks I’ve gotten before.
Clothing - Top Layers
Sports Bras. One bra for every 2-3 days works well, depending of course on the heat and your own body. The Patagonia Active Mesh Bra is a good example.
Short Sleeve Shirt. Also good for 2-3 days. I really like collared button down shirts that are a cotton/polyester blend. I can unbutton to cool off, or turn up the collar to protect the back of my neck. The Patagonia Go-To Shirt is a great example of this. If you’re a t-shirt person, the Patagonia Capilene Cool Daily Shirt is a good option too.
Long Sleeve Baselayer (optional). I leave this at home most summer days, but occasionally in June or September we get cold fronts that justify it. The Patagonia Capilene Thermal Hoody is a good example. Pro Tip - most sun hoodies do the same thing!
Wind Hoody. Sometimes all you need to stay warm is to stop the wind. This piece is almost always in my pack except the coldest days of winter. Check out the Patagonia Houdini Jacket.
Insulated Vest (optional). Here’s another “secret weapon”. An insulated vest works great paired with a wind shirt or with my insulated jacket, and takes up practically no space. I swear by the Patagonia Nano Puff Vest.
Insulated Jacket. The Patagonia Nano Puff Hoody has been my go-to. If I need more insulation, then I bring a Patagonia DAS Lite to stack on top, but that’s another one of my “May/September” problems. If you’re worried about keeping the jacket dry, get the DAS Lite.
Hardshell Jacket. This is an example of something that we bring if we think we need it, and leave behind if we think we don’t. I like to keep it light and minimalist, like the Patagonia M10 Storm Jacket.
Lightweight Gloves. These are typically uninsulated, but they need to have leather or reinforced fingers. These don’t need to be “climbing” gloves - but climbing belay gloves. Gardening gloves work well, leather work gloves work well, mechanic gloves work too. We may use them for climbing, but mine get used most often for rappelling. A simple liner glove will get destroyed in one trip. I do prefer a snug fit in case I need to climb with them with no gauntlet (cuff).
Midweight gloves. These are my “80%” gloves - my go-to pair when I need to wear gloves for actual insulation. Imagine your typical ski glove, except these need to be a bit more nimble for climbing and durable for rappelling. I prefer low gauntlet-style gloves that will fit under my jacket sleeves, as opposed to high or big gauntlet-styles that are intended to be worn over my jacket cuffs. Outdoor Research has the best selection for value. Don’t hesitate to contact me if you need help.
Heavyweight gloves (optional). I find that I don’t need a “heavyweight” glove for the summer, but I’ve witnessed too many people suffering because they operate colder than me (curiously, my typical core temperature is a full degree below average, and I wonder how one is related to the other). Again, Outdoor Research has the best selection in the United States at quite reasonable prices.
Toque (Knit Hat). I bring the heaviest knit hat I can find - because I sleep in it every night. My current favorite is a hand-knit beanie I picked up this summer at a local store. Keep in mind that it may need to fit under a helmet, so it should fit well - no baggy tops or pom-poms! My current favorite is a hand-knit beanie I found in a local store this summer, but you can never go wrong with a Double-Diamond Fisherman Beanie!
Ball Cap. A ball cap is a wonderful thing, and you can never have too many. A five panel hat has become the new “in” hat for climbing because it doesn’t have the little metal top found on traditional ball caps. But if you prefer those more traditional hats (I do), it’s actually easy to make them “helmet ready”: just take a pair of needle nose pliers and snap that metal button right off. Check out the Double Diamond Summer-weight Closed-back Hat (my favorite). Long-haired folks might prefer the DD Summer-weight Snapback version to tuck their pony-tails through. And the DD 5-Panel Hat meets the new-schoolers’ demands. Seriously, these last two hats were asked for by guests.
Neck gaiter. I wear neck gaiters primarily as a headband and lightweight toque in the summer, but I also like to wear one around my neck at night to keep out drafts. “Buff” is the classic company with a ton of options.
Clothing - Bottom Layers
Underwear. Like sports bras and shirts, I recommend a pair of undies for every 2-3 days.
Long Underwear Bottoms (optional). These are a great way to add some insulation to my summer-weight pants if the weather is forecasted to be cold. Check out the Patagonia Capilene Thermal Weight Bottoms.
Shorts (optional). If it’s hot, it’s worth the trouble wearing shorts for the hiking and carrying trousers to change into later. I like to wear longer running shorts with pockets, like the Patagonia Terrebonne Shorts.
Softshell Trousers. I like to wear something that has some resistance to crampons and sharp rocks, but still light enough that I minimize roasting in the August sun. Check out the Patagonia Terraria Alpine Pants.
Hardshell Trousers. Following my Hardshell Jacket strategy, I like something with minimal frill to minimize weight, and if the forecast doesn’t call for it, I’ll leave these in the car. Look at the Patagonia Torrentshell 3L Rain Pants to see what I mean.
Hiking Socks. Again, a pair for 2-3 days. I like the Darn Tough Hiker Micro Crew Midweight.
Sacred Sleep Socks (optional). When it’s colder, I bring a heavier pair socks only to sleep in. On a three-day climb this strategy lets me get away with one pair of hikers, and a second pair of socks to sleep in. In warmer conditions I just bring a second pair of hikers that I get to wear at night and then on the hike out.
Approach/hiking shoes. I’m a huge fan in approach shoes for hiking in. Hiking in full or 3/4 shank boots is tiresome and prone to blisters. If my pack is light enough (like for 2 days), even running shoes work. For Shuksan, we’re looking at 6-7 miles of hiking (one-way) in and out. Consider wearing hiking shoes and carrying your boots until you need them. Contact me if you want recommendations.
Other Pieces of Kit
Sunglasses. You don’t need classic glacier glasses, but you also shouldn’t be squinting. Most ski-style sunnies work great. Go with the darkest tint you can. I’m a Smith Guides’ Choice fanboy.
Headlamp. Nothing fancy needed. I’m relying on the Black Diamond Storm 450 or the Astro 300.
Backup headlamp (optional). You know what’s easier than swapping batteries in your headlamp (or your friend’s headlamp) in the middle of the dark? Just swapping headlamps. So I carry a second minimalist headlamp in my repair kit instead of batteries - right now it’s the Black Diamond Astro 300.
Corrective eyewear. I wear reading glasses. I have witnessed how much trouble putting in and taking out contacts can be. You know what’s really troublesome? Not being able to read a map. Bring what you need, glasses or contacts.
Sunscreen and Lip Balm. I prefer non-greasy sunscreen and SPF rated lip balm.
Personal First Aid Kit. AKA the Boo Boo Kit. I have comprehensive group first aid kit(s) - what is really helpful is if you carry a handful of band aids and the blister bandages that work for you.
Hand Sanitizer. Individual small bottles just work better than a big team bottle.
Bug Repellent. The mozzies (mosquitos), black flies and no-see-uhms can be real. Bring a small bottle of bug repellent - we may leave it behind in the car. Please note: some bug repellents dissolve rope, harness, and climbing slings if it comes into direct, concentrated contact. I do bring DEET, but I also make sure it can’t drain onto the climbing rope.
Toiletries. Travel toothbrush. Travel toothpaste. Medications (both prescription and over-the counter). Done.
Menstrual Care (as needed). Bring what you like to use, and something to pack soiled material out. My missus prefers to use a “Lunette”. Contact me if you need some guidance.
Pee cloth (optional). A classic LNT tool for women. Instead of a trail of toilet paper, consider trying P-rags. They clip or tie to the outside of your pack to air dry and get some UV. Commercial versions can easily be found, but “back-in-the-day” my friends simply picked out a bandana (that wouldn’t be confused with a hair bandana) and kept it tied off on the outside of their packs. Check out the Kula Cloth.
Large Trash-Compactor Garbage Bag (optional). This is a classic Pacific Northwest hack: instead of packing everything in waterproof bags, line your backpack with a trash bag and pack everything inside of it. The trash-compactor bags are thicker/stronger plastic that lasts much longer and the perfect size for 45L-55L packs.
Battery Bank. Watches. Phones. Earbuds. Headlamps too, except I’m resisting having one more thing that needs recharging. My latest favorite find is the Nitecore NB10000, available with USB-A ports (Gen 1), USB-C ports (Gen 3), or one of each (Gen 2). I add super short USB-C and iPhone cables and an Apple Watch charger for a complete kit.
Organizational Pouches (optional). My toiletries, electronics, paperwork, first aid kits, and repair kits all benefit by having some organization and storage in bags, pouches or envelopes. I’ve tried everything, from cheap Amazon purchases to Etsy home-business sewers and expensive travel bags. I found the Daka and Daka Lite pouches (optional). In a recent cross-over from another hobby of mine, I found the Daka and Daka Lite pouches from Magpul work fantastically well. They come in a limited range of colors but a wide variety of sizes, two different thicknesses of material, with and without windows, and water-resistant or water-proof. I’m using these for all of my “hard goods” organization.
Cell phone. AKA my camera that I can make phone calls with. Everything I want my camera to do is accomplished by my cell phone. Since my cell phone is also my principal navigation and map tool - and my book to read at night - and my note book - it comes with me.
Camera (optional). Of course you can bring a real camera if you’re into that.
Satellite Communication Device (optional). It’s getting close, but I’m still not 100% satisfied that all I need is my cell phone and a satellite. So I still carry a satellite coms device pair to my phone - the Garmin InReach Mini2, currently on the most minimal plan.
Post Trip Self-Care. Clean shirt, deodorant, flip flops, fizzy water. Try out LaCroix Limoncello.
Notes on the Gear I Recommend
My gear recommendations are honest opinions based on either 1) what I own and use and/or 2) where I would go first to find a replacement for something in my kit - some of my favorites are sadly no longer in production. My choices are based primarily on function, space, weight and finally value (cost versus durability). What they aren’t based on is sponsorships or paid promotion. I do get discounts from many of the brands I mentioned above, and I have worked for several of those brands in marketing and product development. That was “have worked for” in the past tense. No one is paying me to push their stuff.
Except my own merch, I push that shamelessly.
I do tend to be brand-loyal. When I find something that works for me, I tend to tend to keep using it. If something is working but just a little off I tend to look around at options, and I might experiment and find something that accomplishes the mission better. Like the organizational pouches. Or it doesn’t and I revert back to what has been working already. That’s actually my current story with backpacks. Alternatively, I’ve been using the Feathered Friends Vireo and Tanager sleeping bags since 2004 because I don’t see anything better on the market. I keep trying different clothes but Patagonia is just my go-to when I wear something out, and their customer service has always been stellar. That goes far with me.
All of the links provided above are directly to the manufacturer whenever possible. If you prefer to purchase from your local privately owned outdoor gear store, you are a @#$ing rock star. If you prefer to purchase from REI or Amazon, that’s ok too, no shade whatsoever, I just placed an Amazon order this morning. One great strategy for boots is to order multiple sizes from REI, try them on at home, then keep the pair that fits and return the others. I think my electronics links had to be with Amazon because I don’t know anywhere locally in person to find those pieces. If you find a piece of kit from a different manufacturer that you think works better and/or has better value, tell me about it!
This list will be updated as needed - the publishing date will reflect the latest.