UPDATE 2022: The Improbable just became impossible.
In November 2021 a massive rockfall event occurred on the face above the namesake traverse pitches 7 and 8, removing at least a third of the actual traverse and forever changing the mountain. I think it’s fair to say the Improbable Traverse is no more, but it may be possible to climb the face in some manner by taking the 5.9 alternative up the Big Corner beginning at Pitch 7. I did not get to climb the route this summer and have no idea. If you’re set on adventuring, I recommend speaking with Pro Ski and Mountain Service in North Bend to get the best conditions report possible.
I’m going to leave the route report below available because I’m so damn proud of the work I did to pull it together!
The Improbable Traverse was discovered and climbed in 1960 by Dave Hisser and Mike Borgoff. 60 years later, the climb hasn’t lost any excitement. Today the West Face stares down at the Interstate - some days the sound of traffic can be a bit much. But it still demands carefully route finding and a solid lead head. Grade creep and perhaps FA understatement has bumped up the consensus grade to 5.8, and a few fixed pitons now missing warrant an runout disclaimer.
Guye Peak (5168 ft / 1575 m), West Face. The Improbable Traverse, III 5.8R 10 pitches + “goat track” hiking.
Access (0.45 to 1.00 hour from Seattle):
From I-90, head north into Alpental Valley on Erste Strasse. Pass the Sahalie Ski Club cabin on the right and the Washington Alpine Club cabin on the left. It is imperative that you do not park in their parking lots! Creating negative attention will possibly limit future access. Instead, park in the next large lot on the left (@47.4333, -121.4177). If you’ve made it to Ober Strasse or the house across from that intersection, you’ve gone too far. This year, there were two sandwiche-board road signs stating “No Dumping” in the parking lot, but not No Parking. This is the winter-time snowplow dumping lot for the ski area and the village.
Park here, because parking any closer will be on private roads and bring negative attention to climbers, quite likely making future access more difficult.
Alternatively, you can park at the Commonwealth Trailhead or the Snow Lake Trailhead and walk 10-15 minutes to the intersection of Erste Strasse and Ober Strasse, where the approach notes begin.
Approach (0.30-0.45 minutes):
Walk up Ober Strasse until it doglegs back to the south, the talus field just a stone’s throw to the north. In my experience, the residents of Alpental Village are welcoming to hikers providing they don’t attempt to park on the private village roads and don’t walk though anyone’s yard - so don’t do it! There is a private property parcel here that the residents have turned into a fire ring. Absolutely DO NOT PARK YOUR CAR HERE - there is a no parking - no trespassing sign in the middle of the lot. Just behind the fire ring, a short, well-traveled path leads to the talus field. To date, no one has ever chastised me for using this access - let’s be good climbers and make short work of this to minimize negative attention.
Alternatively, if the conditions change or if you’re told you may not cross this property, one could turn left/north onto St Anton Strasse, follow it to the end, and then follow a short trail to the very toe of the talus field.
Ascend the talus field into the talus gully at the bottom of the West Face. In the gully and at the very end, ascend exposed slabs/ramps until the talus is completely behind you. A dirty, 3rd of 4th class ramp continues straight up, a cleaner 5.0 ramp to the left, a climbable pillar on the left side, and a deep uninviting chimney to the left of that. You may be able to spy the “bail-off” rappel sling hanging from the first tree at the top of the gully.
Gear:
40m lead line. A 50m, 60m or 70mn will also work, but you will have a lot of unnecessary rope.
1 set of cams, #3-#0.3 (Black Diamond, 7 total)
1 set of stoppers, #10-#4 (Black Diamond, 7 total)
4 shoulder slings with carabiners
4 quickdraws
Two cordellettes or triple-shoulder slings, for slinging the big horn anchors on pitches 2, 3, and 5.
Individual gear (helmets, locking carabiners, belay devices, etc) is assumed and not listed here, deferring to your personal preference.

The rope and entire rack - a little less than 10 pounds total..
Emergencies:
Cell phone coverage is good throughout this climb. Keep in mind that if you call for a rescue from the top of Pitch 5 (The Lunch Ledge) to the end of pitch 9, the roofs above prevent a helicopter rescue (it’s been attempted). Mountain Rescue will have to climb up to your location instead.


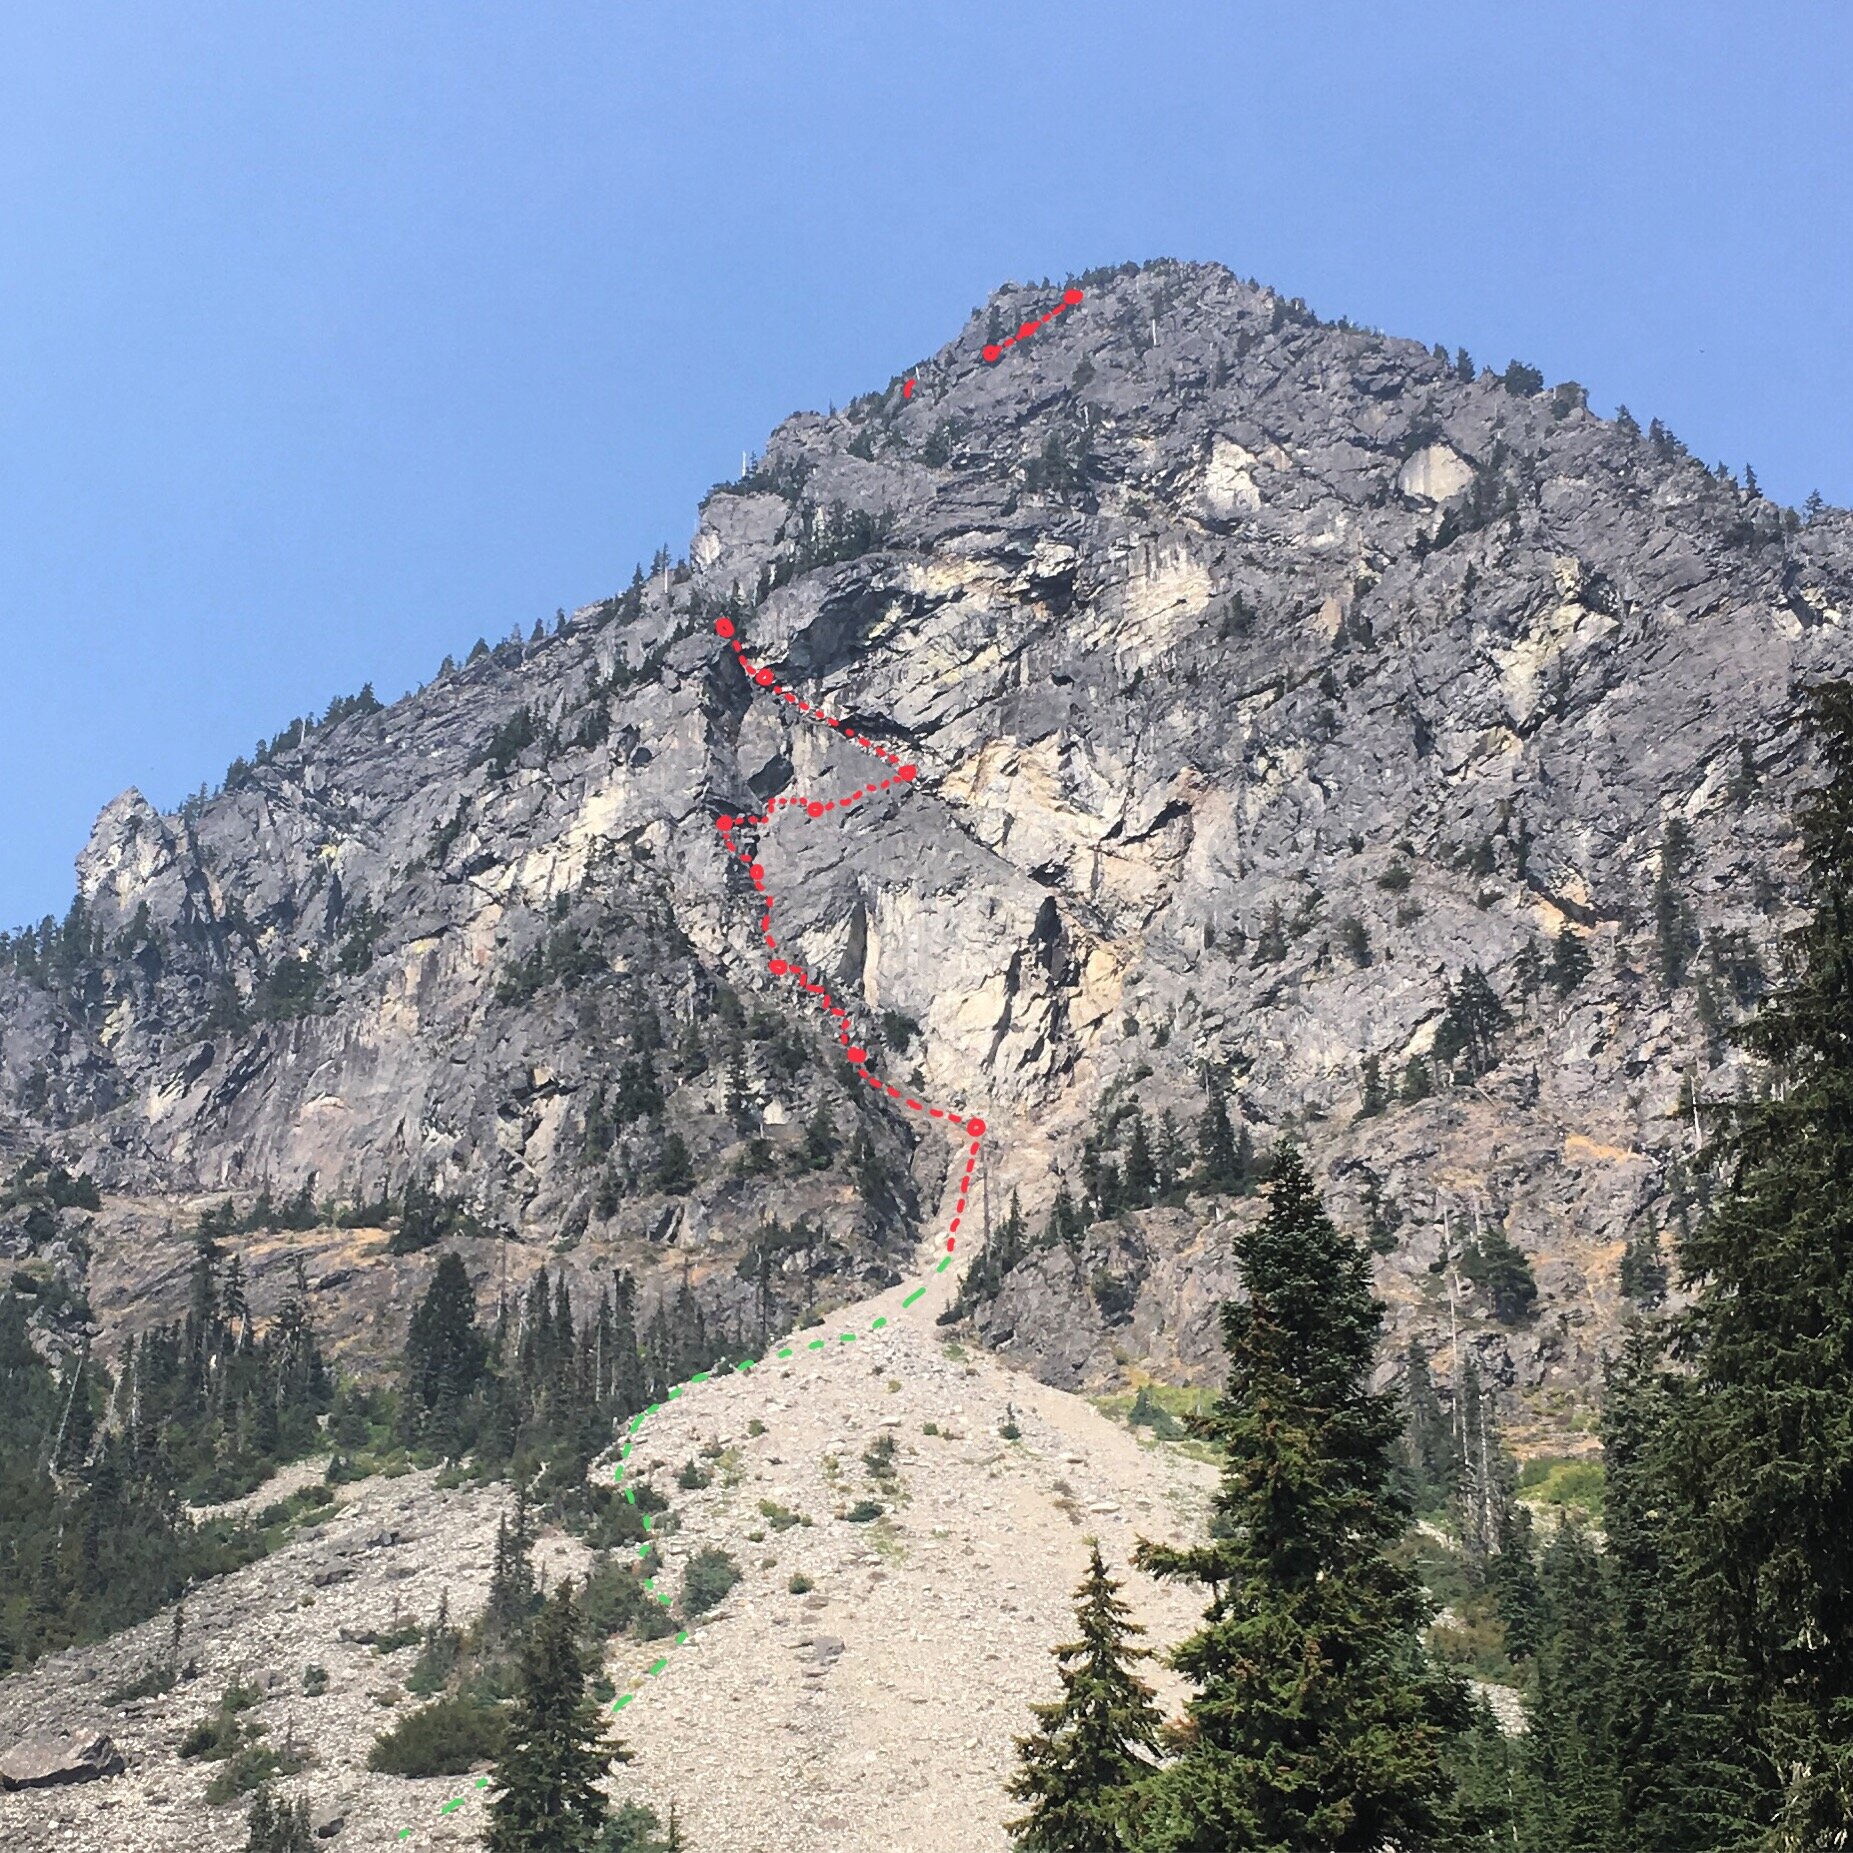
The Route, Overall strategy and Pitch-by-Pitch Narrative:
A key strategy in this route is to climb shorter pitches with efficient belay transitions - the FA likely climbed this route with a 150' ft lead line, and a 40m rope has a similar reach (137 ft). This strategy permits a smaller & lighter rack, makes communication easier, minimizes rope drag, and protects the belayer best from leader or rope-provoked rockfall. I really can’t recommend linking up pitches except for the final two, which only totals 40m anyways.
Pitch 1. 40m, 5.2. Climb the clean ramp to the corner. There are 1-3 opportunities to place gear on this 5.2 slab, and at the top in the corner an arching, downward facing crack allows a gear anchor to be built with gear.
Climbing the dirtier, easy slab to the right is also possible, but then the leader would need to traverse left, dragging the rock through the loose rock. Climbing the rock pillar to the left is also possible, but there is even less opportunity to protect the harder climbing and no suitable belay at the top on the graveling/loose 2nd class, sloping ledge.
Pitch 2. 40m, 2nd class. A quick traverse around the 5th class “headwall” to the far left side reveals a large block on the ground. Arriving on the uphill side of this block (right at 38 meters of rope), and a horn/block above is still slung with an old, cut rope.
Climbing directly up the corners from the P1 belay is loose and likely to kick down rocks towards the belayer - no fun for the leader or the belayer. This traverse around and then doglegging back mitigates that hazard.
Pitch 3. 37m, 5.6. Regain the “main corner” by climbing a series of steps and traverses upward and rightward - the “Changing Corners Pitch”. Now, any rocks knocked off by the leader will bounce down and to the right, away from the belayer. A slung horn/block will be on the left side of the corner at the end of this long pitch, approximately 37 m.
Pitch 4. 25m, 5.6. Avoid the steep, unprotectable corner by first climbing the ledges and steps on the left side, then traversing back into the corner after passing the first 10m of difficulties. Stop the pitch when you reach the slung chockstone in the corner.
It will feel short because it is short! Linking pitches 4 and 5 won’t quite reach with a 60m rope, creates a lot of rope drag, and challenges communication. Not recommended.
Pitch 5. 20m, 5.7. Continue up the corner but turn left at the roofs, leaving the corners and heading for the sapling pine and The Lunch Ledge. Alternatively, climb the face to the left of the belay - a fixed pin marks the far-left alternative but there are less opportunities for protection. Belay using the large horn on The Lunch Ledge. If you’re lucky the raspberry bush is in fruit!
Pitch 6. 30m, 5.7. Leave The Lunch Ledge on a rising traverse across the overhangs that blocked Pitch 5. Afterwards, head up the Big Corner for approximately 10m, connecting fun moves and small ledges until reaching the large ledge heading right, identified by a wedged flake-turned horn. Continue on the ledge, over a small bulge, then descend 2m to a small ledge fit for two people. Save a #2 or #1 cam for the anchor here.
Don’t link Pitches 6 and 7 together, even if you have a 60m or 70m rope. Rope drag and communication would be a real problem as the leader moves through the crux on Pitch 7.
Pitch 7. 30m, 5.8R. Almost immediately after leaving the belay, a fixed kifeblade piton, set 1/2 way in and flexing, is your first and only point of protection before the crux. Girth hitch this with a shoulder sling to minimize leveraging, and continue on. A flat traverse across a sloping ledge leads to a handful of 5.8 moves before a #0.4 cam placement, approximately 20 feet. At least for the follower the hardest moves are well protected by this cam! Afterwards, continue across, but don’t climb up and over a triangle bulge - instead stay low across the base of the triangle, using the crack on either side for protection. A second fixed pin hints the way forward, climbing a rising traverse to the right to reach the ramp pitches. At the ramp, climb 3m/10 ft up to a vertical crack - an anchor here allows the leader to extend to the edge and coach/watch their follower make it across the traverse. This feels like an incredibly exposed pitch because it is an incredibly exposed pitch - the previous five pitches of elevation gain are all under your feet when you finish! With the rack outlined above, I finished this pitch last week with 2 cams and 4 stoppers (including both built anchors).
Pitch 8. 40m, 4th class or low 5th. Scamper up the ramp. There’s a cool fixed ice piton (a Spectre) about 5m up and on the right from the start, cool to see but but it’s not well situated to clip. Run the rope out the full 40m, above a long block on the ramp and into the “Almost A Cave”. It’s possible to back up a good stance belay with 1-2 pieces in the roof above or in the block.
Pitch 9. 25m, 4th / 3rd class. Continue up and out left on moss and pine-needled slab to a slung tree belay. The most difficult climbing is behind you, and most teams switch back to approach shoes here. Keep the rope out and ready for a few more steps and 1-2 more pitches of 5th class.
A “goat track” - really a climbers’ trail - leaves from here and snakes its way up the mountain, bypassing some short and not-so-short walls. The topo shows my best recollection of this trail, but may be inaccurate. A short 3rd/4th class step may be solo’ed through or a quick backed-up stance belay can be provided by the leader. The trail performs another zig-zag, crossing a “ridge” feature, traverses through a gully, then climbs up the other side to a second ridge. Here, progress is stopped by a short 5th class step. The left side is a 5.6-ish fist crack - the right side is a more difficult, maybe 5.8, unprotectable corner. Both are only 3m / 10 ft tall. A backed-up stance belay can protect the follower. Afterwards, the trail continues a short distance to a corner - don’t get suckered to continue past it to a dirty gully.
Pitch 10 & 11. 40m, 5.6. A final pitch - or two - reaches the tree just below the summit blocks. A great belay ledge exists just past 20m, and I’ll normally use that to give a better belay to my partner, and finish with a great stance belay just steps away from the summit. But it is possible to link these two pitches into one 40m pitch all the way into the trees. Afterwards, a quick scramble above leads to the summit blocks.
I recommend packing away the rack, but keep your harness on and belay devices out for a single rappel in the descent.
Descent (1.15-1.30 hours from summit to car):
From the true, South Summit, follow the climbers’ trail away to the north. Stay on the ridge top through the first notch, then up and over the Middle Summit. Just below the next notch, look for the rappel slung tree. You can down-climb the next 20m of exposed 3rd/4th class, but its faster to rig a rappel. Afterwards, coil up the rope and a short hike under and up past the North Summit leads to the descent trail. Just 30’ below is a large rock slab, a great spot to stop, take off and pack all the climbing gear, and take a break. High five - all that’s left is a 45-minute hike down.
If you parked in the Alpental / Snow Lake Trailhead car park, you’ll want to descend the the saddle between Guye Peak and Snoqualmie Mountain, then follow the no-longer-maintained-trail to the west.
If you parked in the gravel lot described above, stay right at all of the trail forks and drop into Commonwealth Basin (east). On a hot summer day, this is really the recommended way down - you stay in shaded old-growth forest, or may even be in the shadow of Guye Peak. The trail descends and traverses underneath the East Face of Guye, before finally intersecting with Commonwealth Creek under the southern aspect of the peak. If you parked in the Commonwealth/Kendal Trailhead car park, cross the creek, turn right on Commonwealth Basin trail, and continue down.
If you parked in the gravel lot, stay right and don’t cross the creek. Keep following the trail down, down, down. Eventually it gains an old fire-road. Continue down that road. Just as the Sahale Ski Club cabin and the top of their rope tow comes into sight, a socially maintained trail leaves the road to the right. The social trail exits to the very end of Unterstrasse in the Alpental village, and following it downhill leads back to Ober Strasse and on down to your car. Along the way residents have asked me if we were the climbers they watched earlier in the day, and then congratulated us for the ascent, a pretty cool feeling.
Amenities:
A reliable cell signal is present throughout the climb.
Gas is available at the pass, but it gets cheaper as you head east or west.
Red Mountain Coffee is the local go-to coffee shop in, sharing space with the Snoqualmie Pass rest stop.
The Commonwealth makes great food, reasonably priced.
Right next door is Dru Bru, a fantastic local micro-brewery. They make an amazing black ale.
Great baked goods are available from George’s Bakery in North Bend, or the Cle Elum Bakery in Cle Elum if you’re coming from the east.


Descent image taken and edited from Cascades Volume 1, by Fred Beckey.
Resources: Cascade Alpine Guide, Climbing and High Routes": Volume 1, Columbia River to Stevens Pass, by Fred Beckey (3rd ed, Mountaineers Press, 2000) and Snoqualmie Rocks, by Kurt Hicks (Obvious Gully Press, 2018) are both currently in print. I found the MountainProject.com listing to be completely erroneous, another project for a rainy day this winter.
To see more photos - especially an incredible sunset over the Alpental Mountains - check out my Instagram feed @simmonsmountainworks!

Disclaimer: Rock climbing, mountain climbing, and backcountry skiing is DANGEROUS. Injury and death are unavoidable risks. This post is for informational use only and not for instruction. Conditions may have changed since this post was composed, and may contain inaccurate or misleading information. The reader assumes all risk associated with the sport , and assumes all responsibility for any accidents and injuries resulting from applying this information in the real world. The author makes no warranties, expressed or implied, that the information contained in this post is accurate or reliable.